

There have been a number of excellent posts on other forums regarding the workings and potential service of a viscous coupling but it seems that so far no one has touched one from a T4. The only option appears to be either, sending to Walter in Germany (makes an interesting telephone conversation!!) at Dorfbrunnen garage for £1K, buy a new viscous coupling £2.5k (yeah right) or remove the syncro capability (what’s the point in that). However, after much research it appears to me that the T4 coupling is just like any other and has the potential to be refilled and seals replaced. The question is, how do you remove the top? And to this end the mystery is now solved. I managed to acquire a split viscous coupling (long story!) that I have dissected with the view to being able to service the viscous coupling on my van. Below is the process I have come up with and used successfully to disassemble my unit.
On the cast iron side of the viscous coupling, remove the filler cap and most importantly bleed nipple. You will notice the bleed nipple is long and this provides a locking mechanism for the cap. The viscous coupling should not be under pressure but due to various reasons when the silicon has gone bad the pressure increases. So expect a bit of a mess.
Place viscous coupling in freezer. Aluminium contracts more than cast iron.
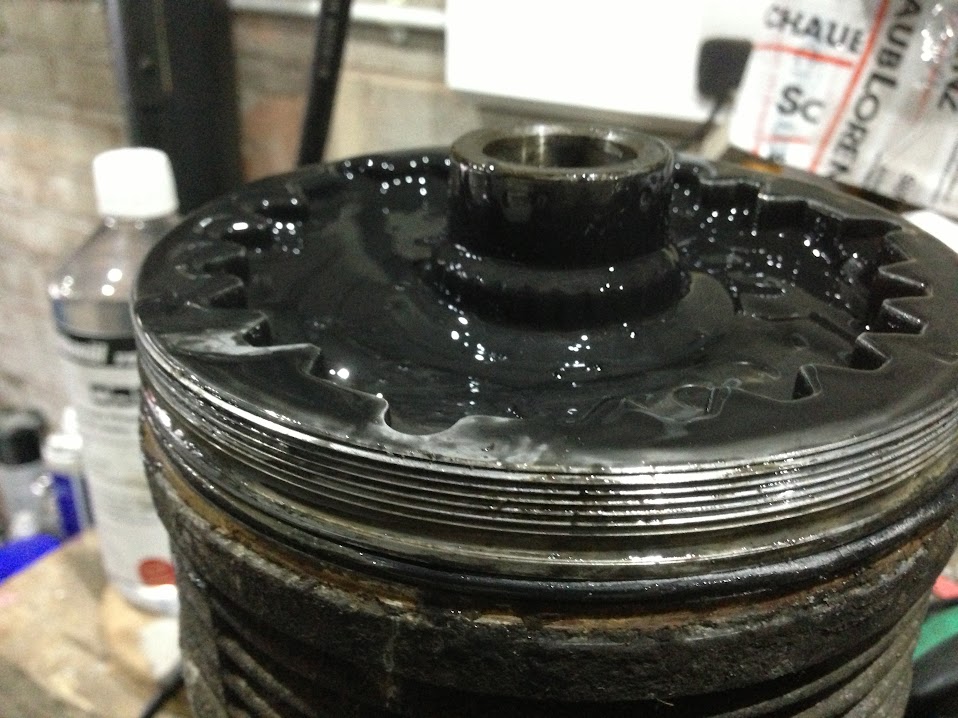
Unscrew the cast part of the coupling from the aluminium part. Now I have made a tool to unscrew the coupling as it is exceedingly tight because the seal for the coupling is on the other side of the thread and thus I think silicon must enter the thread and hinder the process of opening.
![Image]()
Hey Presto! The viscous coupling is open. Now with a bit of silicone and a few seals you can be back on the 4x4 road ASAP.
I can supply all parts to service your VC yourself or I can do it for you, so send me a PM.
Option
1. Supply DIY service kit includes seals, laser cut tool to open, silicone £130
2. Send me your VC to open and I will post back with a service kit for £160
3. I undertake the full service for you £350
I can also supply the correct grade silicone for £30 per 500gm
The wear sleeve from the outside for £45 (this is not available from VW and is a bespoke precision made item.
I also have a good spare VC that I may consider selling in exchange for one that needs servicing. this is a video of the general procedure
http://youtu.be/VqDiAS6l8mE
I am now recommending you add an anti wear additive to the silicone. This will provide a much more stable unit. If you read the entire post you will see it is likely that vw added anti wear agents to the VC originally, which is why they last 120k miles. After this mileage the silicone does degrade quickly. Without an anti wear agent I would change the silicone annually or after 20kmiles
I can supply the anti wear agent for £35
On the cast iron side of the viscous coupling, remove the filler cap and most importantly bleed nipple. You will notice the bleed nipple is long and this provides a locking mechanism for the cap. The viscous coupling should not be under pressure but due to various reasons when the silicon has gone bad the pressure increases. So expect a bit of a mess.
Place viscous coupling in freezer. Aluminium contracts more than cast iron.
Unscrew the cast part of the coupling from the aluminium part. Now I have made a tool to unscrew the coupling as it is exceedingly tight because the seal for the coupling is on the other side of the thread and thus I think silicon must enter the thread and hinder the process of opening.
Hey Presto! The viscous coupling is open. Now with a bit of silicone and a few seals you can be back on the 4x4 road ASAP.
I can supply all parts to service your VC yourself or I can do it for you, so send me a PM.
Option
1. Supply DIY service kit includes seals, laser cut tool to open, silicone £130
2. Send me your VC to open and I will post back with a service kit for £160
3. I undertake the full service for you £350
I can also supply the correct grade silicone for £30 per 500gm
The wear sleeve from the outside for £45 (this is not available from VW and is a bespoke precision made item.
I also have a good spare VC that I may consider selling in exchange for one that needs servicing. this is a video of the general procedure
http://youtu.be/VqDiAS6l8mE
I am now recommending you add an anti wear additive to the silicone. This will provide a much more stable unit. If you read the entire post you will see it is likely that vw added anti wear agents to the VC originally, which is why they last 120k miles. After this mileage the silicone does degrade quickly. Without an anti wear agent I would change the silicone annually or after 20kmiles
I can supply the anti wear agent for £35


