VW T4 Forum - VW T5 Forum banner

How To, Drivers door loom removal, repair and replace, EW, EM, CL lots of pics.

58K views 69 replies 28 participants last post by  BAB  
#1 · (Edited)
As I couldn't find anything on here I thought I might just take a few snaps as I removed my wiring to the drivers door due to the dreaded (wire broke chafed problem)

Image

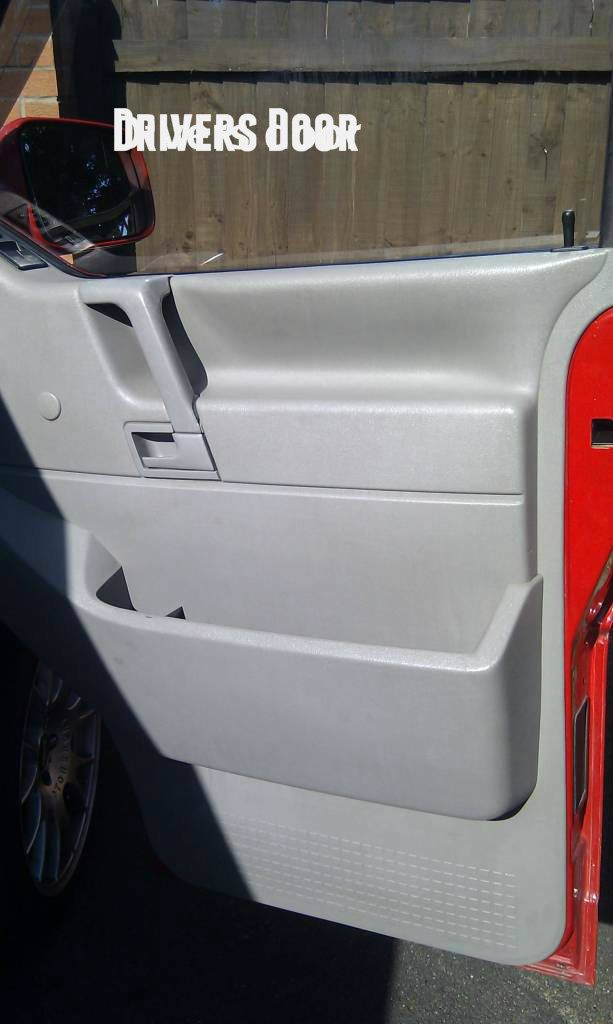
Firstly, remove the drivers door card. 1 screw on the left upper, the platic fixing on the top right, remove the door locking pull pin, slide the front of the grab handle off to reveal 3 large screws. Remove them and pull the door card upwards (not too far though as you need to disconnect the connectors for the windows and mirrors)

Image


Image


Image


Image


Sorted:D

Remove door card and unplug all connectors in the door.

Next you need to access the fuse board.

Image


Unscrew the securing pin to reveal the fuse board. just pull and lift the plastic trim out and this is what you see. Remove the metal plate with a 13mm just to make things easier.

Image


If you feel underneath this cover on the outer edges, you will locate 2 clips, just pull them down slightly and slide the lower cover forward and it will come off to reveal more fuses.

Image

Image

Image


If you look at each side of the fuse board you will see white retaining clips. Just push them towards the front (i used a screwdriver) and the spring off.

Left

Image


Right

Image


Pull upwards and towards yourself and the fuseboard will clear its frame and you end up with this!!!

Image


Then I followed the wires from the door to their respective connectors, checked they were all different and couldn't be mixed up and unplugged them. 2 red and 1 blue

Image


There is also a brown earth wire that comes from the door that is earth direct to the inner wing, if you pull back the sound deadening by the throttle pedal you can just follow it. 10mm spanner removes this.
Disconnect all the loom in the door
Image

Image

All I did then was chuck a huge dollop of wd40 in the bellows and slowly pulled them into the door, being careful to feed the connectors through.
And there you have it. I foo*ed door wiring. Damn site easier to fix now tho. Checked with vw ÂŁ148 for a new 1:eek::eek::eek: So soldering we shall go.
Image


When I've fixed it I'll take some pics of putting it back and put them on here
Cheers
Ian.
 
#8 ·
Re: Drivers door wiring removal (electric mirrors, windows, central locking)

Didn't realise there's a plug on the other end,repaired mine last year and it's gone again,I will replace the loom and fit a new bellow,has yours got cl ew em?
Yes. They are just connectors inside the body as well. Once you have removed the fuse board, just reach up to your door wiring loom and follow it till you get to the connectors. Yes mine is EW,EM,CL. The part of the loom thats inside the van has conduit around it to stop it bending, I think this may add to why they seem to all fail in the same place. I'm looking at making the part of the loom thats sits in and either side of the bellows stiffer to try and stop it happening again, or lubricating it in some way so it can move forwards and backwards as the door opens and closes without damage.
Replacing the loom will set you back ÂŁ148 from vw. And its no improvement on the original.
Ian when u have done yours let u have a look at my elecy windows:
Thanks Rob, Cant wait:eek::eek: I'm going to do the passenger side next. Get it out and have a look mate, bet you its fualty.
 
#11 · (Edited)
Re: Drivers door wiring removal (electric mirrors, windows, central locking)

Next was to repair all the damaged wires. So 1st was to secure the loom so that the new wires were all the same length.

Image

Image

Image


Tested the soldering using just the 2 wires together and also stripping a crimp tube down to the bare metal and using that for a more protected connection. The stripped down crimp tube was a lot neater and less bulky ( as heatshrink was used to isolate each wire)
Just the wire
Image

Image

Using the crimp tube stripped

It was just a case of cutting the bad wire out trying to spread the new connections in different places along the loom to eliminate future damage. I didn't colour code the new wire as it didn't really matter. Not a hard job, just time consuming.

Image


Image

Image

Image

Image

Once a bit of progress was made, a couple of nails were knocked in the bench to keep the fixed and unfixed wires apart, save doing further damage with the soldering iron.

Image


Image

Some repaired
Image

Image

All done. Took about 3hours with tea breaks (I like tea) phone calls and a bacon egg and mushroom butty :D.

Image


All taped up ready to be tested on the van

Image


Tested it and everything worked a treat except the central locking, especially using the electric windows with the doors wide open. What I found after testing all the wires with a multimeter (ther were all ok :D ) was that I must of blown this fuse when removing the loom. Its the 15A (blue) on the right of the pair at the bottom, so it might be worth removing this 1st.

Image

Replacing was just the reverse of removing. I put some pull wires though the bellows to help with pulling the connectors through ( I went from door to cab as there are less connectors to pull through and its easier) I added an extra pull wire which I will leave in the bellows in case I need to feed wire through in the future.

Image


Image


Oh yea. I put a fair bit of wd40 in the bellows prior to pulling the connectors though. It makes is a lot easier

Image


Spare pull cable for future use

Image


Image

Image


There you have it. Happy new electics in the door:jmpg:jmpg:cheers
Hope this helps.
Cheers

Ian:D
 
#18 ·
#15 ·
Re: Drivers door wiring removal (electric mirrors, windows, central locking)

Thanks Paul.
Your help was greatly appreciated T: I dont know what the hell has happened to the earlier pics. :*
I've left the conduit that was wrapped around the loom that was inside the veh body off it was also cable tied so couldn't move. I think this is a contributing factor to the cause of the problem. Now there is no securing of the loom inside the body of the van, I have given enough space for the whole loom to be able to move as you open and close the door. Hopefully it will stop it having to fold completely over as you close the door. I'll keep my eye on it and post the results on here. I have also chucked a fair bit of WD40 into the bellows to reduce anything getting caught.
There was a big smile of satisfaction when it was all connected up and working tbh :D:D. Plus a saving of ÂŁ148LOL:
 
#17 ·
Re: Drivers door wiring removal (electric mirrors, windows, central locking)

I'm guessing you've moved or deleted the images on photobucket? Perhaps you've moved them into a new folder or something? The link you originally posted points to a specific place where you stored the photo, if that has changed because you moved or deleted the photos, the link becomes broken.
 
#24 ·
Yes. Thats how I came to the conclusion mine was shot. If you open the drivers door, then remove the bellows from the door and try and push it into the van body (WD helps This exposes more of the loom to check) Then remove the cloth insulation at the van end of the loom, you will no doubt reveal damage to the wires.
Any probs, gimme a pm
 
#27 ·
Nice one Ian,
My drivers door and sliding door central locking on my van weren't working when I bought the van. Stupidly I just went out and bought solenoids as I thought that this was the prob. After spending ages removing the ply lining on the door and then the million of clips on the door card I found the solenoid, swapped in over an still nothing.

So either I've bought broken solenoids, which I doubt, or the sliding door contacts are broken, a fuse has gone or the wiring is a bit suspect. Apart from the blue 15A fuse you had to replace do you know if any other fuse could be a culprit as my blue one is intact.

I then had a look at the drivers door. Removed door card and again swapped the solenoid. Still nothing. Now I'm thinking more damaged wires from the fold you mentioned.
If you can think of anything else which could help in the meantime then please let me know.

Top thread and I'll be using it next week when I remove my loom and check for wire damage.
 
#28 ·
If you push back the bellows from the drivers door, then unwrap or cutaway the insulation and have a look. I pulled the bellows out of the door and forced them into the body of the van to reveal more of the wiring, then removed the insulation. The wiring tends to fail closer to the van body than the door. I'd check that 1st as its free:D. Is it only the drivers and sliding door that don't work? Do the others still lock and unlock?
The other problem it could be is the actual door mechanisms, but I'd deffo check the loom first.
Cheers
Ian

I blew the 15a fuse whilst removing the loom. It was fine before.
 
#29 ·
Hi Ian, good post. Just repaired my loom in situ, right pain to do. If I'd found your post earlier I'd have removed the complete loom! I disconnected the battery fist as I wasn't too happy with the fizzing and popping that was coming from the bare wires|:eek: Now everything works a treat. (even the light on buzzer which packed up years ago) T:
 
#33 ·
It may not be all the wires that are damaged, just a few. I'd definately check before spending any more though. Do you know, I don't know if my headlight on buzzer is working or not:*:* Must check that one.

Quick question (in my mission to install remote central locking).

Is it possible to buy the connectors I (picture at the beginning of this thread). both male and female.

I am hoping to build a 'Y' wiring loom to add into the loop to connect a HAWK remote central locking hub. This would be great if it worked and I could create a how to to make its install easier.

Thanks
Andy
I think thats a question for a auto electrical supply company. You could always rob them of a scrap van and put your new wires in :)
 
#32 ·
Quick question (in my mission to install remote central locking).

Is it possible to buy the connectors I (picture at the beginning of this thread). both male and female.

I am hoping to build a 'Y' wiring loom to add into the loop to connect a HAWK remote central locking hub. This would be great if it worked and I could create a how to to make its install easier.

Thanks
Andy
 
#37 ·
Ready for a laugh? . . . . . .

Attended Bus Fest last Sat and purchased a damaged drivers door loom for ÂŁ20. The intention was to repair then swap with existing fitted loom on van and so have zero time without disruption from no elec windows driving about etc.

Well I spent about 2.5 hours repairing the loom to a fairly decent standard similar to this threads pics. Spent a further hour or so removing door card and factory fitted loom. Them a further half hour threading in the repaired loom.

Connected up the central locking plugs no problem then to my horror found out that the other 2 connectors (red ones) have an extra pin in each than my repaired loom ie. a different plug!

Arrrrrrrggggggghhhhhh!

I now have no loom in my door as I need to repair the factory one which I inspected and foun nearly all but the elec window wires snapped. Oh well you win some, you lose some.

Does anyone know which model has the 4 and 6 red pin plugs so I can pass this repairs loom onto someone else in this predicament?

Update you when I've calmed down and factory loom repaired.

Matt.
 
#38 ·
ready for a laugh? . . . . . .

Attended bus fest last sat and purchased a damaged drivers door loom for ÂŁ20. The intention was to repair then swap with existing fitted loom on van and so have zero time without disruption from no elec windows driving about etc.

Well i spent about 2.5 hours repairing the loom to a fairly decent standard similar to this threads pics. Spent a further hour or so removing door card and factory fitted loom. Them a further half hour threading in the repaired loom.

Connected up the central locking plugs no problem then to my horror found out that the other 2 connectors (red ones) have an extra pin in each than my repaired loom ie. A different plug!

Arrrrrrrggggggghhhhhh!

I now have no loom in my door as i need to repair the factory one which i inspected and foun nearly all but the elec window wires snapped. Oh well you win some, you lose some.

Does anyone know which model has the 4 and 6 red pin plugs so i can pass this repairs loom onto someone else in this predicament?

Update you when i've calmed down and factory loom repaired.

Matt.
lol:lol:lol:lol:lol:
 
#39 ·
Fixed Finally.

Spent a hell of a load of hours replacing sections of the snapped wires (about 10!)
Threaded them through and connected them up and hey presto windows, central locking and electric mirrors are working.
I'll try the heated side of things in the morning.
I can now open my windows to pay for my fuel rather than open the door. Ha ha

Tomorrow I pick up my TT blue leather heated seats. Full installation thread to follow.
Matt.