VW T4 Forum - VW T5 Forum banner

Orion's ex-AA T5.1 Swamper Build - Team Yellow!

3 reading
31K views 228 replies 34 participants last post by  suty455  
#1 · (Edited)
Hi All. I thought I might do a build thread about my Swamper styled 2015 reg T5.1 T32 140 after a year of fettling and tweaking.

I love reading other folk’s posts and build threads and have found some really useful help, ideas and inspiration so I hope this of interest to others.

So in September 2021 I sold my LWB T5.1 180 BTDi Caravelle and became “vanless” for a few weeks while I hunted for a new project.

It’s surprising how bereft you feel with no van on the drive.

I knew I wanted a reasonably newish T5.1 (or maybe T6), ideally SWB (LWB was a bit big for the driveway ).
Prefered 6 speed ,140, tailgate and air-con. I had a budget anywhere from £15K to £25K depending on the van and work required.

I found ( and then kept coming back to ) a yellow ex-AA 2015 T5.1 on eBay that was fairly local ( only an hour away ), a reasonable price and had a decent semi converted interior with R&R bed although still a hardtop. It had 2 x side windows fitted but no rear tailgate window.

This appealed on a number of counts. It ticked the tailgate, air-con, 6 speed, 140 boxes etc but I also loved the yellow colour!

Having most of the interior work done would save me a lot of time and money but also still give me the flexibility of adding my own touches as well as adding some of the major stuff like a pop top.

I could see in the advert images that it had a quality interior including RIB seat, furniture from Camper Worx in a Vohringer blue grey metallic finish, a solid composite worktop with an interesting radius fridge step out. It looked to have some nice black alloys which turned out to be nearly new Oz 18"'s.

Appliances already fitted were a 12v JustKampers fridge and Dometic 9222 combi sink / hob. It also had a full set of decent internal silver screens, a nice bonus.

The van had a full AA service history up to 90K as well as more recent entries including a cambelt and pump change.
Current mileage advertised was around 110K.

So quickly booked a trip to view, met the nice young guy selling it, had a test and inspection, did the usual checks, bit of a haggle, handshake and bought including a full tank of fuel, screens and an unused matching table, rail and folding leg.

Happy with that as it left me with around £6 to £7K in the kitty to complete the van to my liking, possibly more if required.

Image


Image


Image


Image


Image


Image


Image


I had a list to sort out from my inspection:

The front driver seat was a bit worn and needed new foam, cab USB wasn't working , the engine warning light was coming on intermittently.

Tow bar not working, a couple of very small dinks and chips, rear bumper had a "lump" under the tailgate.

The roof still had the GPS and aerials attached plus the (supposedly) plugged holes from the AA lighting bar.

The Sargent K115A electrics just needed the external hook up sorting.

But, fundamentally, nothing major so time to crack on.

I had decided ,virtually from the moment I saw it, that the final outcome was going to be more of a Swamper style than lowered "lean ‘n’ mean".

I had downloaded loads of Swamper van images off the Net as inspiration and really like that style of van.

First jobs were some wing decals, black sequential side indicators and wind deflectors.

Big fan of deflectors , even have them on my little Kia Picanto daily now !


Image


Image


Image
 
#2 · (Edited)
Next job was to remove the front grille and badge and fit a de-badged version with yellow trims.

My other half really liked this saying "it looks less like an AA van now!" .

Then a new gear stick 6 speed knob and gaiter.

Went for a simple yellow stitch on black as I hadn't decided yet on what seat covers I was going to end up with so kept it subtle.


Image


Next job was fitting a Vankraft folding seat bracket to the double passenger seat.


I decided from the start to keep the double seat as we occasionally need to sit 3 in the front for IKEA runs, festivals and the like.

The storage space under the passenger was a novelty as well with my last two vans both having swivel singles to the front.

I couldn't fit a swivel double base yet as the tow bar electrics needed sorting and the module was under the passenger seat. I did remove some more AA wiring, fuse blocks and second battery fixing plate under the seat

I also made a ply insert from the Vankraft template which forms a simple seat when folded down and a solid surface to step up into a pop top if fitted.

Very pleased with the result as it makes a great “shelf” when working and really opens up the cab area when folded down.

The 10% extra reclining angle also makes the passenger seat a bit more comfortable as well.


Image


Image


I also bought some primed wing mirror covers and rear tailgate spoiler.

I removed the interior stereo and heater trim and the nearside and offside cab heater trims and sent the lot off to the spray shop for a nice few coats of AA Yellow.

While I had the dash apart, I took out the basic VW stereo, replaced the broken traction control button and removed a weird metal bracket that must have supported some AA gizmo.


Image


I rewired the dash USB that the AA seem to fit in all these vans ( changed to a twin version and piggybacked off fuse 19 )

I also added a 12v socket to the inside of the glove box ready for the reversing camera I planned to fit shortly.


Image


The engine warning light that came on intermittently was also diagnosed by my trusty local garage as a faulty EGR.

Turns out it was fairly new ( the guy who sold me the van said it had been replaced fairly recently on a service ) but almost certainly a no brand cheap make.

Swapped out for an OEM Pierburg one, job done. No more light since.

The spray shop sent me some images to show how things were going which I got a bit excited about. I hoped that these wouldn't look too O.T.T!


Image


Image


It was now December so I bought a new stereo off eBay as my Xmas present to myself ( any excuse for van stuff..).

I wanted a genuine VW for ease of wiring, but it had to have Bluetooth & Sat Nav so tracked down a mint RNS 315, duly delivered and simply fitted with plug and play.

Got an SD card off the Bay and updated the maps to 2021 full UK & Europe, nice! I also added a cheap Amazon GPS module behind the glove box, worked a treat.

With hindsight I should have changed the cab light and added the VW microphone for hands free which became a much later job.

I bought the same solar powered wireless reversing camera from Amazon I had fitted on my previous Caravelle as I was so pleased with it.


Fits neatly on the rear number plate with the camera at the top and the solar panel / battery and the LCD screen sits nicely on the cab top tray.

I drilled a hole for the monitor cable in the rear of the top tray and took it through the bulkhead to the 12v supply previously fitted in the glove box.

The remote on / off button is fixed to one of the dummy panels in the dash near to the steering wheel.


Image


Image
 
#3 · (Edited)
The bits came back from the spray shop, so it was time to put the dash back together.

I was really pleased with how the yellow highlight trims looked, funky and really freshened up the cab.

I also fitted a yellow and black steering wheel cover from Amazon that was actually a lot better than I was expecting!

Image


Image


Image


Image


I also re-fitted my removable snack table that I kept from my last van.

The holder fits in the recess and the table just clips in when required.

Great bit of kit, very useful and perfect for "Mackie D's" !


Image


I fitted a rear view mirror to the existing windscreen bracket ready for the new tailgate window at a later date.

Hung the obligatory yellow flower garland...

I then changed the original black wing mirror covers to the new yellow ones, bit of a fiddly job especially in the cold.

Lot's of fragile clips! I used a hairdryer to keep them flexible.

The new yellow grille ties into these quite nicely I thought.


Image


I didn't want to fit the rear spoiler until I had my pop top fitted ( I hadn't decided on which one at this point ).

In the meantime, I bought some custom smoked rear lights and upper tailgate LED off eBay.

While the old light covers were off I swapped the existing rear driving and reversing bulbs to LEDs.


Image


Next on the list was a new rear black VW badge to replace the silver one.

Judicious mix of hairdryer, fishing line and trim tool finally removed the original.

Scraped off the residue and the new one was fitted.

I had also fitted a new tow ball ( why did the AA remove it..?) and yellow ball cover.

The back end was starting to look a lot better.


Image


Image
 
#4 · (Edited)
Time for some more interior work.

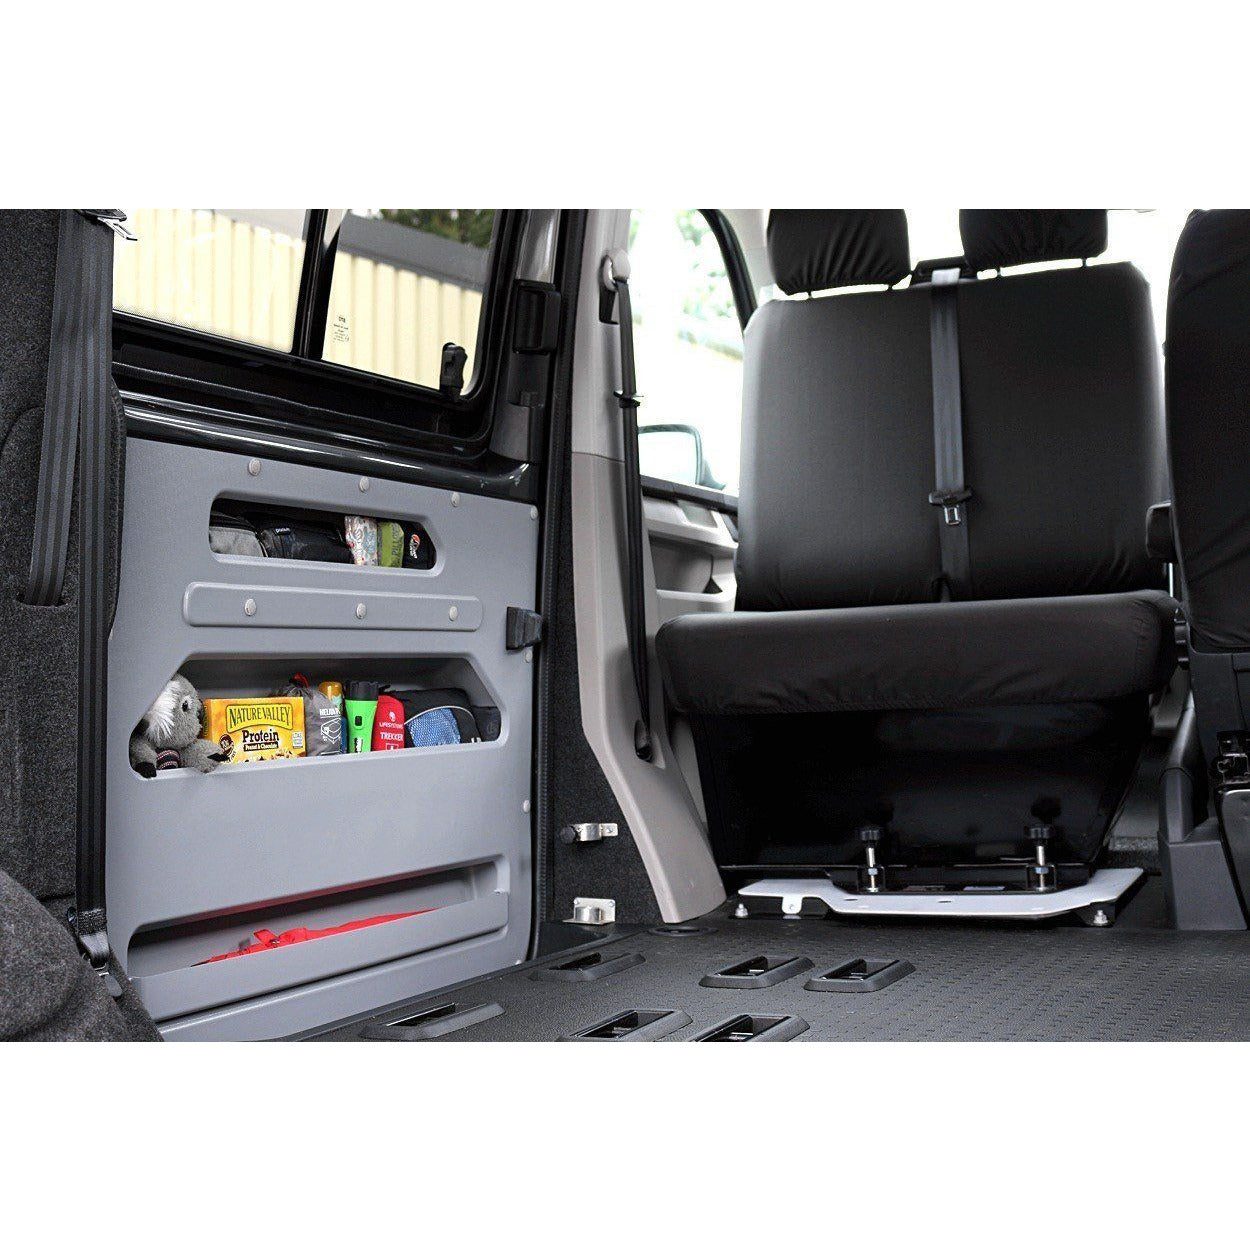
I removed the carpeted board from the sliding door and fitted a Kiravans door tidy.


Really easy fit, just taps into the existing holes.

Huge improvement to the look of the door and some instant additional storage.


Image


I then removed the existing carpeted board from the front of the RIB bed which seemed a waste of space

I bought and fitted the specific height 2 door RIB panel from EVO in a the same matching blue metallic as the furniture.


The main van furniture is edge trimmed and the EVO is knock on silver trim, but you have to look twice to notice it.

This was much better as I now had access to the space under the RIB from the front as well as the seat


Image


Image


I also wired in some plinth lights to the under-cupboard lights loom.

Bit miffed as they were supposed to be cool white LEDs ( as my upper lights ) but turned out to be warm white.

Didn't notice until I had fixed everything in, but I can live with it.


Image


Image


The van had a simple piece of unfinished timber to stop the water tanks from flopping around

This didn't really work and looked pretty poor so I changed it to a piece of matching board with silver edging.


Image


I spruced the front cab doors up a bit with some nice leather pocket inserts and door handle covers with yellow stitching and embossed VW logos.


They also came as a package with dash recess liners but I didn’t use these as I had my table bracket and cup holders already fitted.

I also fitted a replacement electric mirrors knob with a black knob with yellow VW logo .


Image


Image


Image


I also fitted some Van X padded armrests to the door tops.


The driver’s seat doesn't have armrests so these are great for just resting your arm on, a bit softer than the door!


Image
 
#5 · (Edited)
Next job was the replacement driver seat foam base and then fit seat covers.

I removed the driver's seat so I could get the base off easily.

Then removed the fabric to reveal the damaged foam ( the cover was washed while off, amazing how much dirt came out of it ).

The new foam was fitted and the fabric put back on ( not a particularly easy job, the wire hooks are a pain...a couple of helpful Y.T videos helped)

While the seat was out, I added a 240v mains extender block with a couple of sockets and USBs to the side of the fridge housing wired back to the Sargent unit

I also fitted a couple of 60mm ventilation grilles to the rear of the fridge housing for additional ventilation.

I refitted the seat and ordered some seat covers off eBay.

Another quick job that made a difference was adding new "Golf Thunk" door seals to the driver and passenger doors.

A nice bit of soundproofing and the Golf thunk...

I also took off the curved door in front of the fridge and re-hung it with a R.H hinge as for some reason it opened opposite to the fridge and wouldn't open fully against the rear passenger seat. This was more pronounced since fitting the Vankraft bracket.

I also ran a pair of long solar cables to the battery compartment.

The MC4 ends were simply coiled behind the driver’s seat ( for use with my solar panel ).

Once the solar cables were in, I added a Victron 75 115 mppt solar controller wired to the battery

I had a folding 4 section lightweight 100w solar panel that I could lay against the windscreen and the cables would simply go through the driver’s window.

I also have 2 x Renology 100W folding suitcase panels that we use with our River Pro power pack that can also be used to charge the leisure battery if required.

The wind deflectors are perfect for leaving the window open slightly for ventilation but also feeding the cables through ( but no rain getting in.)

They had worked well on my previous Caravelle where we simply fed a 240v E.H.U 3 socket "block" in through the window rather than a fixed E.H.U point.


Image


Next job was Electric Hook Up to the Sargent unit.

I took the cable out through the interior rear quarter panel and then fed through the offside rear light grommet.

Then down through the plastic rear quarter moulding to one of the neat new "mini" E.H.U connectors.


Image


Image


Image


Success and the orange light glowing! 240V external mains power now sorted. External yellow mains cable of course!

I also wired in a 3 pin socket into the Sargent unit and fitted a NOCO Genius 5 battery charger direct to the battery.

The Sargent has a 12v battery charge function on mains but I had plans to change the main leisure battery later to an AGM and I understood the Sargent isn’t keen on these.


It's now January 2022 and time for more big spending!

Getting ready now for the Pop Top, diesel heater , awning rail and rear window.

I had been doing quite a bit of research regarding pop top suppliers and prices and narrowed it down to probably Westdubs, Austops and Vamoose.

I contacted a fairly local Austops supplier, but they wouldn't entertain the idea of fitting with the furniture and RIB seat in the van.

Told me it would all have to removed as they only fitted empty vans. So they were struck off the list.

Westdubs would fit with furniture in situ but they were miles away.

No matter, by now I was particularly interested in Vamoose as the simplicity and ideas behind the product appealed.

They were also based only an hour away over the hills near Sheffield.


I made an appointment and was blown away by the professionalism of their set up, immaculate premises and knowledge.

Having the furniture and RIB in didn't faze them, just needed to check I had a bit of “ceiling” clearance for the nibbler when cutting.

I booked the van in for the following work:
  • Vamoose Pop Top with LED light supplied and fitted £2,650
  • Colour matched to AA Yellow £399
  • Deluxe bed board ( roof and board carpeted to match van ) £399
  • Vamoose bespoke inner thermal silver screen pop top liner £225
  • New rear tailgate window supplied and fitted £210
  • Diesel heater supplied and fitted ( tank fed ) £850
  • Vamoose black multi rail supplied and fitted £150
  • And ( as a freebie ) they would fit my rear spoiler!
  • Total cost £4,883.00 including VAT.
  • ( prices as of Jan 2022 )
Very reasonable I thought for the whole package. Deposit paid!

They were really busy but I managed to get a slot for early March 2022. I felt like a little kid waiting for Xmas!

Meanwhile the seat covers had arrived so they were duly fitted which was a fairly easy job.

I did take the driver seat base off again as this made it easier.

Once they were on I thought the fit was “passable” for the money but they still looked a lot better than the plain , slightly worn VW grey fabric. I did consider earlier on either changing the front seats fabric or buying new seats in VW Simora to match the rear RIB seat

I decided to go with the grey faux leather padded covers and yellow VW logos and stitching for a bit of contrast ( and more of a "Dub" look ). The additional padding is comfy and the replacement foam base makes the driver’s seat feel like new.


Image


Image


Image
 
#6 · (Edited)
Mid March 2022 came around and it was time to go to Vamoose for the pop top etc.

They needed the van for 2 full days which I thought excellent for the quality of all the installation work involved.

I had also brought 3 x tap hole stoppers from a plumber’s merchants which I had sprayed with plastic primer and then multi coats of AA Yellow finished with lacquer.

These were to blank off the 3 x holes to be created by the removal of the roof mounted GPS and aerials.

Simon said he had seen these used before but in a chrome finish so thought the yellow would look really unobtrusive.

A couple of last "before" photos at Vamoose. Goodbye van...back soon!


Image


Image


Image


A couple of days later back over the hills to Vamoose for collection.

Wow, what a difference just the new back window made, never mind a pop top!

Perfect colour match on the roof and the spoiler finishes off the back end nicely.

Simon gave us a great in-depth demo of how to use and fold the roof , roll the straps , bed base, fit the thermal liner etc

Also a quick demo of the diesel heater and it's control panel.

I cannot recommend Vamoose highly enough. They really transformed this van.

Couldn't wait to get it home and have a good fettle with all the new stuff!


Image


Image


Image


Image


Had a good play with the pop top, enjoying the novelty of the van now having two "floors"

An upstairs and downstairs as well as standing room! The 3 tap hole stoppers worked brilliantly, barely visible and totally waterproof.

The Smoke carpet matching by Vamoose was also spot on. I loved the extra bonus of the nice LED light

They include this as part of the installation with 2 light settings, bright white or blue "night" mode, nice.


Image


The diesel heater control panel was fitted to the left of the hob and the outlet in the rear of the driver’s seat EVO panel.

The inlet, as with most heater installations, is in the driver’s foot well.

I paired the remote and gave it a longer test, the van was soon warm & toasty!

I noticed though that the heater outlet, even angled away, made the side of the fridge housing get quite hot to the touch at the higher heat settings. This made me think the fridge might have to work a bit harder even with the extra ventilation I had added.

So I purchased a small fireproof ceramic fibre block ( 300mm x 200mm x 20mm ) and sprayed it black with stove paint

This is now attached with Velcro to the cupboard at low level opposite the heater outlet when required.

Works brilliantly, no heat at all on the cupboard side even when the heater is on max.


Image


Image
 
#7 · (Edited)
I found some nice yellow 3D printed VW bobbins for the pop top straps which makes rolling and storing them easier and just looks a bit cooler.

I also added a storage net made for the California pop top which fitted the Vamoose roof perfectly!


Very handy when sleeping "up top" for earplugs, book or Kindle, phone storage etc.

Also, handy when driving to store bits n bobs in as its over your head.

Image


Image


Next job was more interior work in the form of Van X curtains for the two side windows and tailgate window.

I went for the deluxe blackout versions with grey inners and black outers.

Fitting them behind the hob / sink was a real pig of a job, there was so little clearance, and I couldn't remove the "window" furniture frame.

Managed it in the end, never again...


Image


Image


Another quick job, I added some gloss yellow gel inserts to the rear black badge.

Simple but nice mod. Not quite the same yellow but looks good enough and makes the badge stand out


Image


Image


Also fitted a new tailgate seal as it had a few cracks at the base.

More external work now adding the plastic trims that should help to give it that "Swamper" look!

Faux grilles to the rear quarters, headlight brows, bonnet protector, wheel arch and side trims, handle protectors and window pillar covers.

For a few black plastic pieces these really add up in price!

Rear grilles, door handle and pillar trims added. Wheel arch and side mouldings to follow.


Image


Now time to swap the existing 255 45 18s tyres for some nice Davanti Terratoura All Terrain 255 55 r18s load rated at 109.

Big difference to the look now, much more “beefy”!

For the time being I have decided to keep the OZ Racing 18" black alloys but might go for some Rhino's at a later date.


Image


Image


Image
 
#8 · (Edited)
More plastic trim to fit! Bonnet next plus the side trims. Loving the yellow and black mix!


Image


Also added "Swamp" decals from Beatnik.


Image


I booked the van in at the garage before the final side trims so they could remove the rear bumper and refit it.

Since I bought the van I had been baffled by a slight bump that was catching the tailgate.

When I was at Vamoose Simon took one look at it and said whoever had taken the bumper off to fit the tow bar hadn't clipped it in fully at the top so creating the "bump".

Anyway, quick trip to the garage and sorted.

Whilst in there my trusty chap also fitted a nice matt black bull bar to the front.


Image


Another job that was outstanding was sorting out the non-functioning tow bar electrics.

I had a mobile Auto electrician come to my workplace and two hours of hunting, fettling and a bit of swearing later we discovered a cut CANBUS cable behind the carpet in the driver’s wheel arch.

Obviously, another hatchet job by the AA.

The sparky soon had this repaired and the module all working with full electrics restored to the 7-pin at the rear. £70 well spent!

Great stuff as I could now use my Thule bike rack and Back Up cargo box if required.

Very tempted to spray the cargo box yellow...!


Image


Some more interior "bling" with a purchase from Fat Bob of some nice grey and yellow rugs and carpet.

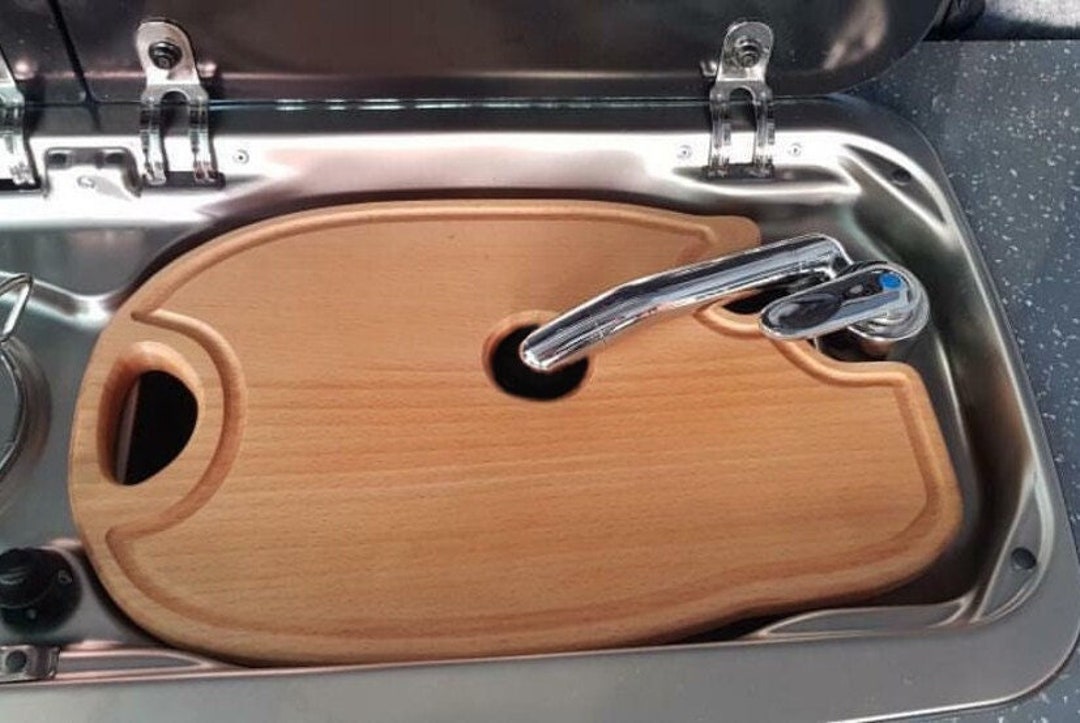
Also ordered a custom chopping board for the 9222 sink plus 2 x Cup holders with yellow VW logos for the cab heater recesses.


Image


Image


Image


Image
 
#9 · (Edited)
Ordered and fitted the cheap Amazon LED clock "hack" for the cubby hole.

The clock just pops in so easy to remove to change the batteries when required. £15 bargain!


Image


It's now May 2022 so time to take the van for its first trip and give it all a test.

Off to Anglesey for a couple of nights. Lovely site on a farm right next to the sea.


Great weather and the van performed admirably. I couldn't resist spending a night up in the pop top and it was great.

Bit windy being directly on the seafront but a really comfy nights sleep ( earplugs essential ! ).


Image


Image


We took a TV with the van but it's a small screen and as we mainly watch films, I decided to ditch it and fit the same projector system I had in my old T4.

I had kept the 40" 16:9 screen plus the mini projector when I sold it and found the screen fitted perfectly when attached to the bed board.

I fitted a metal GoPro fixing plate to the bed board for easy removal of the projector when not in use so there is nothing hanging down to catch unsuspecting heads.

The bracket is set at exactly the right distance for the mini projector to fill the 16:9 widescreen.

I use a 256Gb USB stick packed with films so there is always something to watch.

It’s not the sharpest picture ( it’s a cheap Amazon projector after all ) but perfectly adequate for use in the van or awning and miles better than squinting at a small TV.

It's great reclining on the RIB bed with the backrest angled up watching a film. The RIB seats are a genius design.


Image


Image


Next up I added some Swamper lettering to the front protector.

Now looking at it I kind of wished I had spaced them out more but others have said they look OK so they'll do.


Image


Next I added the VW microphone and a new ceiling cab light. I only had the basic light and needed the one with the microphone fitting.

I should have done this when I bought the stereo. Never mind, the light was £20 off eBay and the mic £7 so not breaking the bank.

Changed the 3 x bulbs to cool white LED. The light is a simple swap over and I now gained 2 x map lights as well, nice

Bit fiddly trailing the cable as I had to remove the glovebox, dash bits and A-pillar trim then wire fish and run the mic cable down from the upper cubby to the stereo.

Easy to clip in at both ends though. Worked perfectly, now got hands free Bluetooth.


Image


Image


Image
 
#10 · (Edited)
Got a little VW AA van for the dash as a reminder of how it once looked in another life!

Image


Camper Calling 2022

Image


Dubbed Out 2022

Image


Image


Image


To Do List ( as you all know it never ends... )

Tidy up the rear bumper as it’s a bit scratched and worn, needs some Back to Black or similar.
With hindsight I should have bought a new black one and simply had the garage swap it over when they re-fitted it

Fit new inner door seal to Drivers side

Zen graphics matte black strip decal to lower tailgate.

Rear false blackout windows to rear quarters.

Swivel passenger double seat base

Engine remap from 140 to around 170

Transporter HQ smoked sequential rear lights

New AGM 120a Leisure battery. The existing one is a bit tired.

New drive away air awning. Sold our last Vango as it was a bit too big. Now want a mid sized one for longer stays, festivals etc.
We use a simple Outdoor Revolution Sport Canopi ( non drive-away) for quick stays.


I'll add more pics etc as the list gets ticked off!

I know it's not a mega technical thread as it was a decent camper base already but I hope it's of interest and you like my van as much as I do. (y)
 
#11 ·
Great build thread pal! Definitely come along way since it's AA days and the swamper look definitely suits it well. I agree with your idea too - the lid of your cargo box needs colour coding to match (just to add to your never ending list!) 😁

Interesting to see you don't appear to have a passenger airbag? I thought they all had them beneath the glovebox.
 
#12 ·
Great build thread pal! Definitely come along way since it's AA days and the swamper look definitely suits it well. I agree with your idea too - the lid of your cargo box needs colour coding to match (just to add to your never ending list!) 😁

Interesting to see you don't appear to have a passenger airbag? I thought they all had them beneath the glove box.
Cheers 64, I hadn't really considered the air bag until I had the trim off...

I think most of the ex-AA vans I have seen don't have airbags on the passenger side. They all seem to have the USB outlet instead.

It's an easy way to spot them in adverts as well as the 2 x yellow charging points front and rear!

I don't know if they are removed or simply not specced? Be interesting to hear from knowledgeable folk on here if they have any more info.
 
#14 ·
Great thread Orion, lots of work and pride gone into the "scamper" (I'm trade marking that 😁), all the yellow details really pull it all together. I'm sure I've said it before, but if I haven't, I'll say it now, t's one of my favourite vans on here 😎
 
#25 ·
Great thread, can I just ask where you got the chopping board from I have the same sink coming and that looks really neat
Glad you liked it!

No worries, the chopping board is from a guy called Matthew on Etsy.

You can personalise it for free , I had a VW logo and "Adventure Edition"

Delivered a couple of days later. Great item and great service!

 
#28 ·
I love Etsy, some interesting stuff from small "makers". I have bought quite a few individual and unique items.

My little VW cab table was a present from my daughter off Etsy when I had the Caravelle, sadly I don't think you can get them anymore.

Just type "campervan" in or "VW camper" and all sorts of stuff pops up.


#30 ·
Thank you for sharing your thread Orion!

I've seen you post your van in various stages throughout the forum and it's always looked awesome, great to see it in more depth and for the amount of time you've had the van, you've done quite a lot!

The pop top you went with was really well priced for what you got with it! A poptop for us is something for us to have in the future!

And thanks for adding to the list with having your interior pieces the same as the van! I'll have to get mine done now!😂
 
#36 ·
Hey Wills, glad you liked it!

The Vamoose pop top is similar in price to some others: standard top with white roof £2,650.00 inc vat, colour match to van £399.00 inc vat, Bed £399.00 inc vat

I just loved the way Simon and team have been making them in house for years and are super experienced. It's not the flashiest but it's bomb proof.
 
#37 ·
Can i ask is the rear just on shocks and springs Orion ? I did some work as a commercial body builder years back and the AA stuff all got bagged on the rears to help with the extra weight ....not sure they bother now .
Are you keeping the Anderson plugs ?
The van is on stock suspension, I didn't bother raising it as the T32 suspension seemed to look OK to my eyes and it rides really well. I'm sure are no bags on this model, my garage man had a check.

I kept the Anderson plugs as I liked the yellow "splashes" front and back but they are disconnected, wires cut and terminated. Shame as you can buy the Anderson jump leads.

So no helping out broken down cars with flat batteries anymore unfortunately...