

THIS MIGHT HOPEFULLY HELP SOMEONE- HERES HOW I CHANGED THE OIL IN MY 2001 2.5TDi 88hp T4. IF I CAN DO IT- ANYONE CAN! SERIOUSLY!!
Tools & things you'll need-
VEHICLE JACK
AXLE STANDS (My van is lowered by 60mm)
REPLACEMENT OIL FILTER (ahem)
5 to 5.5 LITRES OF GOOD QUALITY OIL (Usually i buy best i can afford like Castrol or Mobil etc etc but differentpepople swear by different oils- choose one that is at least what VW spec!)
ENGINE FLUSH TREATMENT (wynns or similar) THIS IS OPTIONAL!
10mm, 13mm, 19mm, 27mm & 30mm SOCKETS (These are what i needed on my van- yours may differ!)
CATCH TRAY FOR USED OIL (i use an old plastic washing up basin bought for £1 in Asda/ Poundland- make sure its at least 6 litres to safely catch oil without overflowing- VERY BAD!!!!!)
OLD RAGS TO CLEAN OIL OFF HANDS AND ENGINE
STRONG PLASTIC BAG FOR OLD FILTER & OILY RAGS ETC.
Firstly- give your van a run to get it up to temperature (90deg) and the oil nice & runny, then i always add an engine oil flush treatment - directions on tin- and take another 15 min spin to get it working around the engine.
Park on a FLAT surface and let the engine cool a little bit to stop you getting scalded.
I usually start by opening filler cap in engine bay- gives a good flow when you undo sump plug under van.
Jack up your van both sides and place axle stands underneath at SOLID jacking points- i always use standS- its suicide just working with only the jack supporting your van!!!
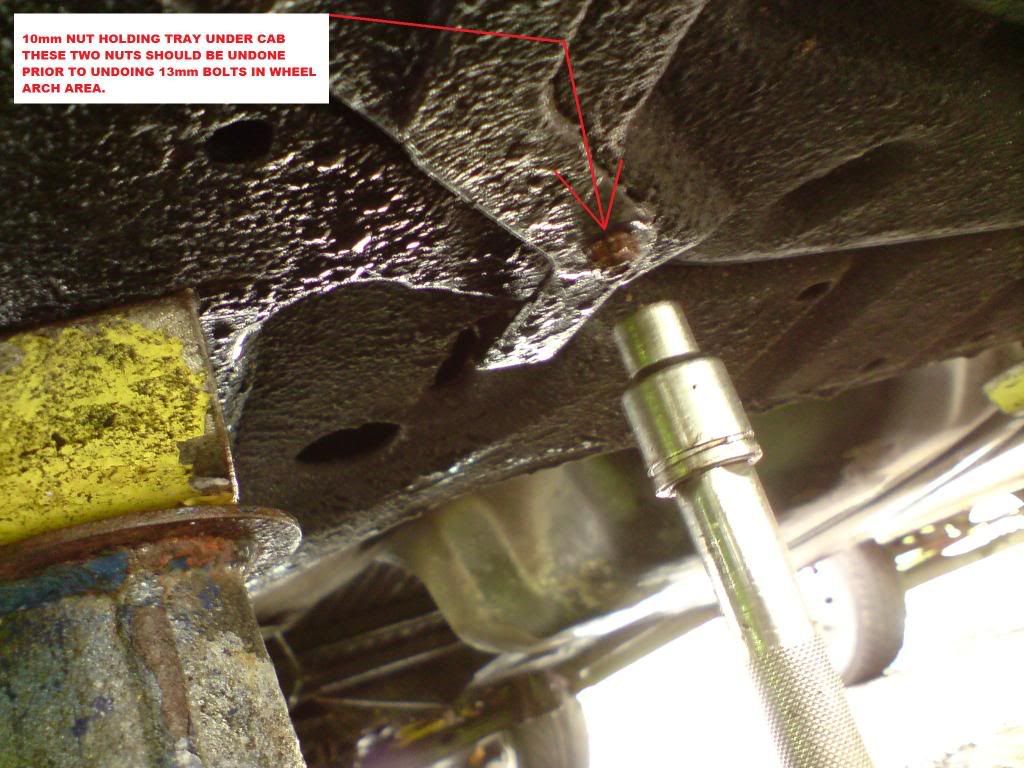
If you have a protective tray/ shield under engine/ sump (as i have) undo the two 10mm nuts supporting the back of the tray.
These are REALLY small and INSIGNIFICANT looking, but are vital as they stop the tray from dropping down on their pivots.
![Image]()
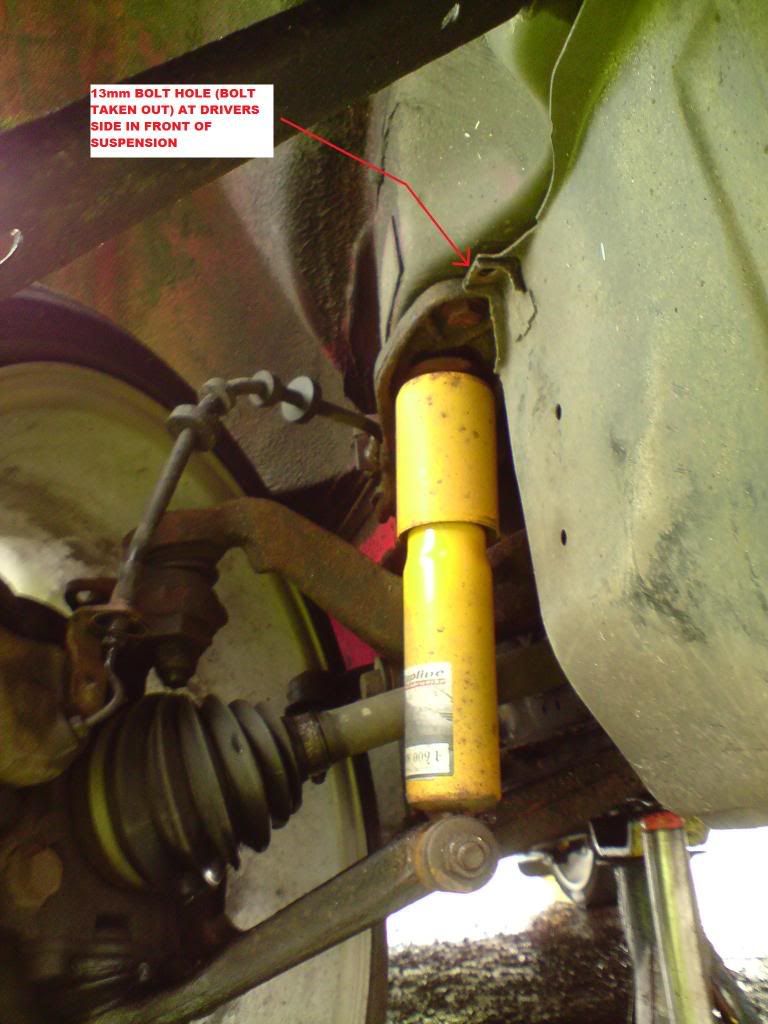
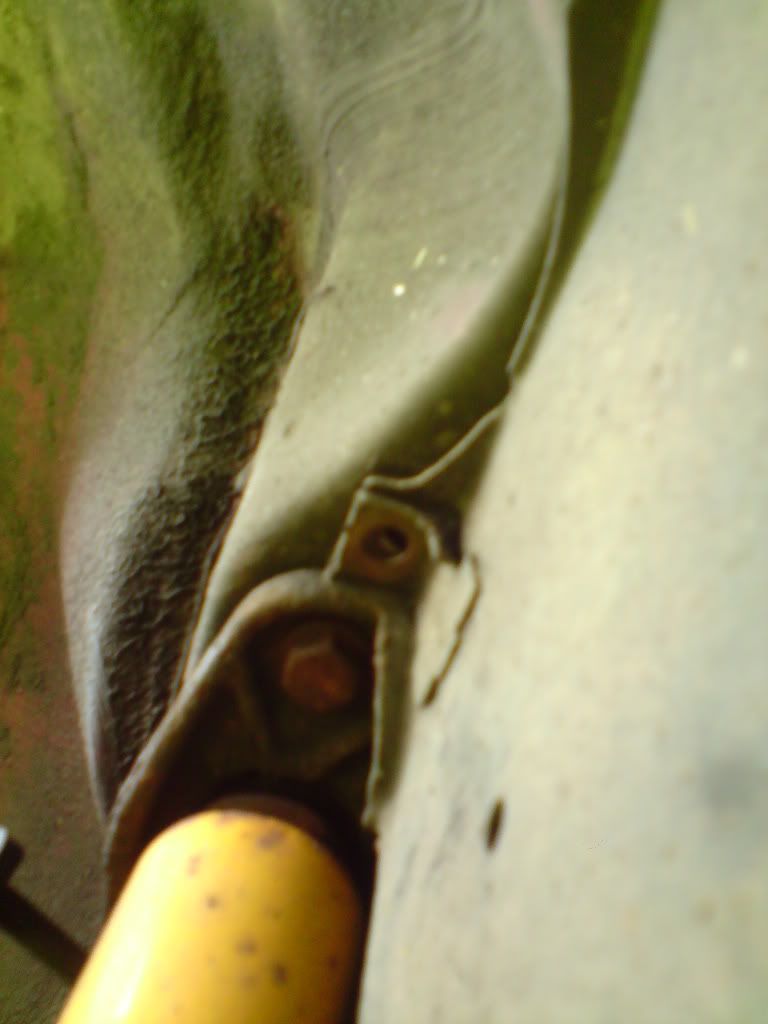
Undo the 4 x 13mm Bolts (2 each on either side if van in wheel arch space) These are more easily identified, as you will see from pics.
![Image]()
![Image]()
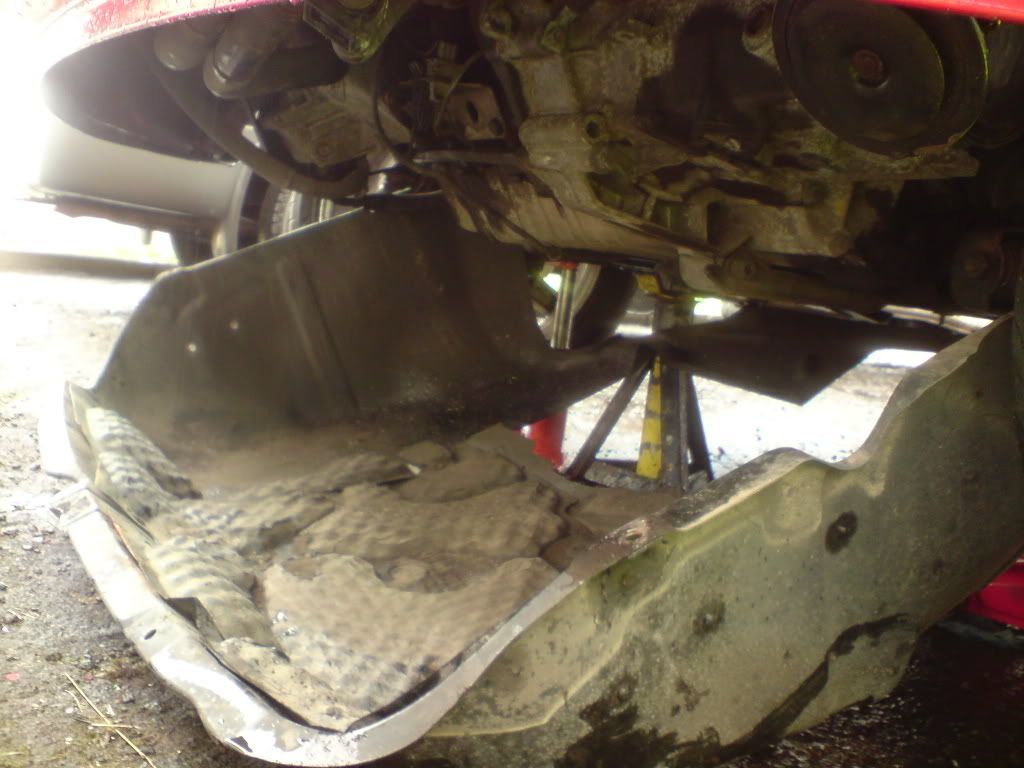
The tray will now drop down at front of van- i had to pull my bumper out by a few mill to allow it to drop fully.
Wiggle the tray around, pulling down and back until pivot supports drop down, allowing you to remove tray from under van completely. (This is a bit of a pain in the :* a*se if its raining and your lying under the van- i need a bigger garage! )
)
![Image]()
Now the SH*TTY messy horrible part (I strongly advise a pair of rubber gloves for this bit!)
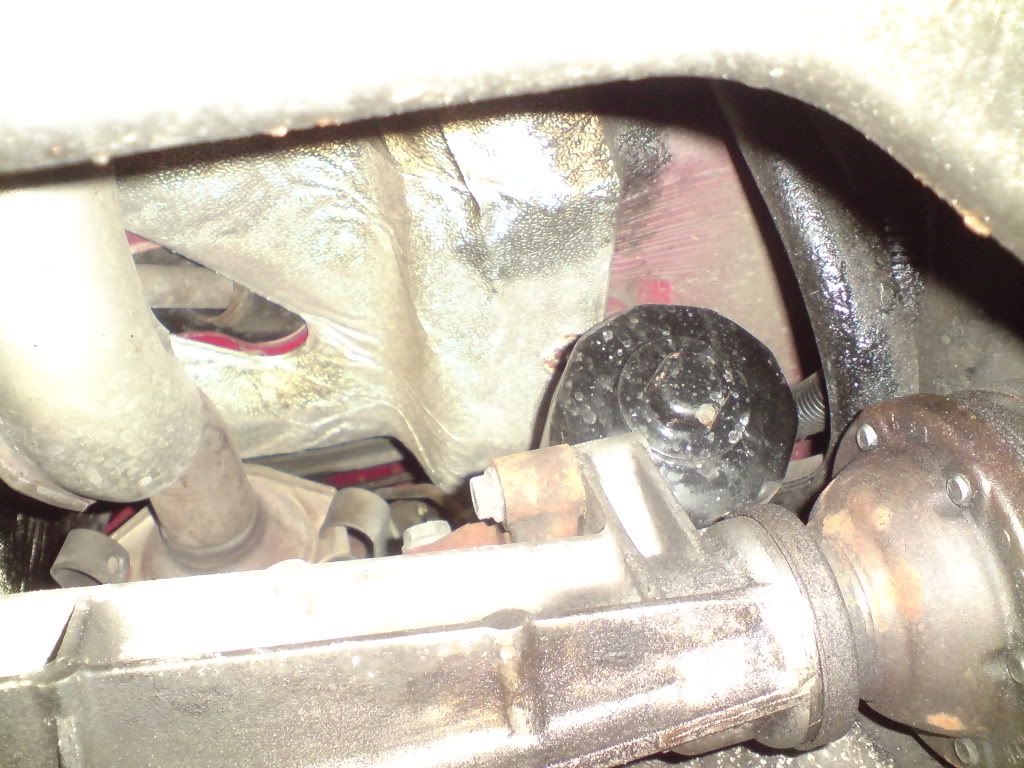
Crawl under the front bumper, and ith your feet pointing towards the front of the van you should be able to identify the oil filter at the back of the engine (usually black & shiny), around the area that sits directly under the drivers seat.
![Image]()
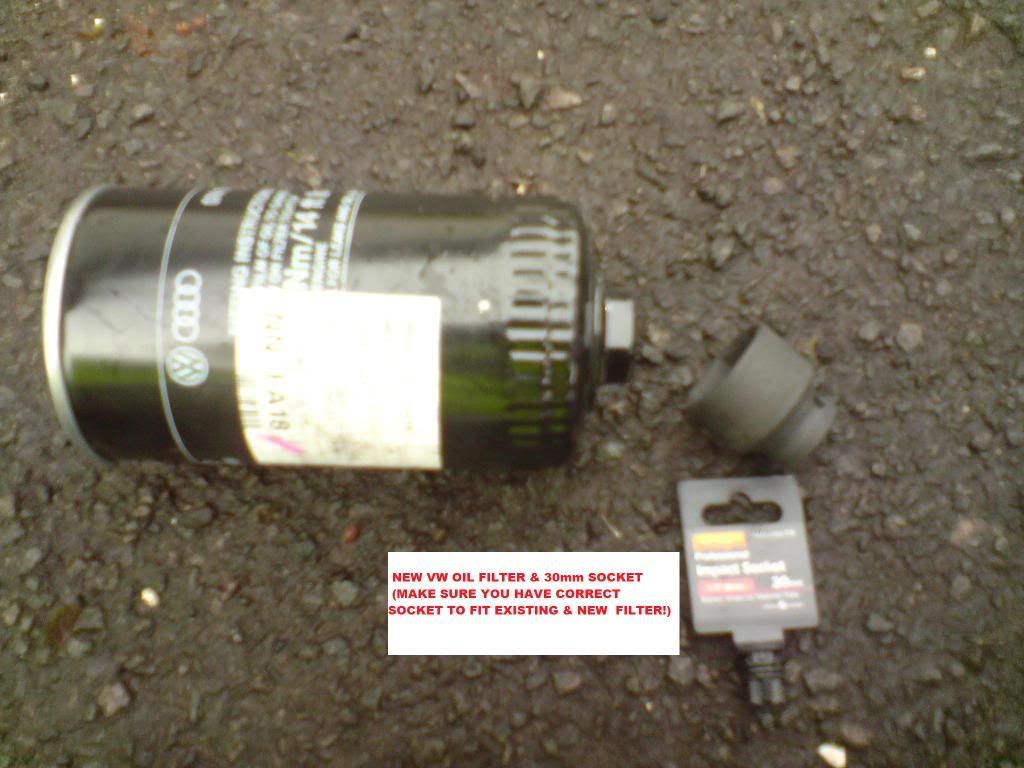
Check what size the nut is for your socket. I had a MAHL filter on the van which is 27mm socket size and my VAG replacement is 30mm!! (Cue trip to Halfrauds :bhd)
![Image]()
Before you undo the filter (all you want to do is identify what socket you need!), locate the sump plug (see pics- usually on lowest part of engine case, on rear facing back towards rear of van).
![Image]()
This is 19mm on my van.
Put your catch tray (basin I directly under and back of this as oil will SHOOT out at first in direction of back of van. Guranteed you'll get caught out if first time- we ALL were!! (Keep rags handy!)
Undo your sump plug at first with your socket, then by hand, as you NEED to catch it before it falls into the old oil. You REALLY dont wanna go fishing for it!
Drain your oil A: I usually make a brew and take it easy for 30mins while this happens, making sure all my old oil drains out. It makes putting the sump plug back in easier too
If you've been clever you'll have caught the sump plug along with the copper washer- i usually just clean these up and re-use (although many will disagree and say buy a new copper washer- iv did this for YEARS without any leaks! Make sure the washer isnt warped or nicked etc & it'll be fine.)
When all the oil out, put the plug & washer back on to the correct torque (not too tight- you'll strip the threads. I usually do it hand tight then nip up a quarter/ half turn).
Now move your old oil out of the way & undo the old filter. I used a 3" extension piece on my ratchet.
Take the filter out VERY CAREFULLY, holding it as upright as possible- its full of hot oil.
Pour old oil into your basin and put the old filter into your plastic bag to stop any mess.
Clean around your engine and most likely oil will have run onto the axle etc etc- its inevitable!
Now take your NEW filter, HALF fill it with new fresh oil. HALF fill because you have to angle the filter to get it on the thread and when full, oil will tip out (I learned the hard way!)
You dont have to put oil in the filter at this point, it just helps get it round the engine quicker and gets the level sorted quicker too.
It also helps to smear a tiny bit around the rubber seal.
Now tighten the new filter on the thread till hand tight then put your socket on and nip up about a quarter/ half turn- dont tighten too much- it does more harm than good!!!!
A:A:A: HARD BIT OVER A:A:A:A:
Pour in 5 litres of your oil (or whatever your engine takes- REMEMBER this is based on MY van not yoursI
Check where oil level is on dipstick & top up as necessary so it sits just below the top/max notch.
Run engine for a few mins to let filter fill up properly, and allow oild to flow around engine then turn off & leave oil to settle back into sump for 10mins.
Then re-check oil level at dipstick & top up as necessary.
DO NOT FILL ABOVE "MAX" LEVEL ON DIPSTICK- YOU'LL INCREASE OIL PRESSURE & BLOW SEALS
Run the engine again until it reaches working temperature, turn off, crawl under van and make sure no leaks from sump plug or filter (tighten to suit).
Re Fit the engine/ sump guard and Jobs a goodun A:A:A: (Just keep an eye on leaks & levels after next few journeys)
£££'s saved
PLEASE POUR YOUR OLD OIL INTO YOUR EMPTY CONTAINER AND TAKE TO LOCAL RECYCLING POINT- ITS SO EASY TO DO.
DRAINS ARENT FOR OIL- IT F*CKS UP THE ALREADY SH*TTY SEWER TREATMENT SYSTEM & POLLUTES WATER SYSTEMS.
I GOTTA SURF IN THAT SH*T!!!!
Hope this helps.
(.
[/COLOR]
Tools & things you'll need-
VEHICLE JACK
AXLE STANDS (My van is lowered by 60mm)
REPLACEMENT OIL FILTER (ahem)
5 to 5.5 LITRES OF GOOD QUALITY OIL (Usually i buy best i can afford like Castrol or Mobil etc etc but differentpepople swear by different oils- choose one that is at least what VW spec!)
ENGINE FLUSH TREATMENT (wynns or similar) THIS IS OPTIONAL!
10mm, 13mm, 19mm, 27mm & 30mm SOCKETS (These are what i needed on my van- yours may differ!)
CATCH TRAY FOR USED OIL (i use an old plastic washing up basin bought for £1 in Asda/ Poundland- make sure its at least 6 litres to safely catch oil without overflowing- VERY BAD!!!!!)
OLD RAGS TO CLEAN OIL OFF HANDS AND ENGINE
STRONG PLASTIC BAG FOR OLD FILTER & OILY RAGS ETC.
Firstly- give your van a run to get it up to temperature (90deg) and the oil nice & runny, then i always add an engine oil flush treatment - directions on tin- and take another 15 min spin to get it working around the engine.
Park on a FLAT surface and let the engine cool a little bit to stop you getting scalded.
I usually start by opening filler cap in engine bay- gives a good flow when you undo sump plug under van.
Jack up your van both sides and place axle stands underneath at SOLID jacking points- i always use standS- its suicide just working with only the jack supporting your van!!!
If you have a protective tray/ shield under engine/ sump (as i have) undo the two 10mm nuts supporting the back of the tray.
These are REALLY small and INSIGNIFICANT looking, but are vital as they stop the tray from dropping down on their pivots.
Undo the 4 x 13mm Bolts (2 each on either side if van in wheel arch space) These are more easily identified, as you will see from pics.
The tray will now drop down at front of van- i had to pull my bumper out by a few mill to allow it to drop fully.
Wiggle the tray around, pulling down and back until pivot supports drop down, allowing you to remove tray from under van completely. (This is a bit of a pain in the :* a*se if its raining and your lying under the van- i need a bigger garage!
)
Now the SH*TTY messy horrible part (I strongly advise a pair of rubber gloves for this bit!)
Crawl under the front bumper, and ith your feet pointing towards the front of the van you should be able to identify the oil filter at the back of the engine (usually black & shiny), around the area that sits directly under the drivers seat.
Check what size the nut is for your socket. I had a MAHL filter on the van which is 27mm socket size and my VAG replacement is 30mm!! (Cue trip to Halfrauds :bhd)
Before you undo the filter (all you want to do is identify what socket you need!), locate the sump plug (see pics- usually on lowest part of engine case, on rear facing back towards rear of van).

This is 19mm on my van.
Put your catch tray (basin I
directly under and back of this as oil will SHOOT out at first in direction of back of van. Guranteed you'll get caught out if first time- we ALL were!! (Keep rags handy!)Undo your sump plug at first with your socket, then by hand, as you NEED to catch it before it falls into the old oil. You REALLY dont wanna go fishing for it!
Drain your oil A: I usually make a brew and take it easy for 30mins while this happens, making sure all my old oil drains out. It makes putting the sump plug back in easier too
If you've been clever you'll have caught the sump plug along with the copper washer- i usually just clean these up and re-use (although many will disagree and say buy a new copper washer- iv did this for YEARS without any leaks! Make sure the washer isnt warped or nicked etc & it'll be fine.)
When all the oil out, put the plug & washer back on to the correct torque (not too tight- you'll strip the threads. I usually do it hand tight then nip up a quarter/ half turn).
Now move your old oil out of the way & undo the old filter. I used a 3" extension piece on my ratchet.
Take the filter out VERY CAREFULLY, holding it as upright as possible- its full of hot oil.
Pour old oil into your basin and put the old filter into your plastic bag to stop any mess.
Clean around your engine and most likely oil will have run onto the axle etc etc- its inevitable!
Now take your NEW filter, HALF fill it with new fresh oil. HALF fill because you have to angle the filter to get it on the thread and when full, oil will tip out (I learned the hard way!)
You dont have to put oil in the filter at this point, it just helps get it round the engine quicker and gets the level sorted quicker too.
It also helps to smear a tiny bit around the rubber seal.
Now tighten the new filter on the thread till hand tight then put your socket on and nip up about a quarter/ half turn- dont tighten too much- it does more harm than good!!!!
A:A:A: HARD BIT OVER A:A:A:A:
Pour in 5 litres of your oil (or whatever your engine takes- REMEMBER this is based on MY van not yoursI
Check where oil level is on dipstick & top up as necessary so it sits just below the top/max notch.
Run engine for a few mins to let filter fill up properly, and allow oild to flow around engine then turn off & leave oil to settle back into sump for 10mins.
Then re-check oil level at dipstick & top up as necessary.
DO NOT FILL ABOVE "MAX" LEVEL ON DIPSTICK- YOU'LL INCREASE OIL PRESSURE & BLOW SEALS
Run the engine again until it reaches working temperature, turn off, crawl under van and make sure no leaks from sump plug or filter (tighten to suit).
Re Fit the engine/ sump guard and Jobs a goodun A:A:A: (Just keep an eye on leaks & levels after next few journeys)
£££'s saved
PLEASE POUR YOUR OLD OIL INTO YOUR EMPTY CONTAINER AND TAKE TO LOCAL RECYCLING POINT- ITS SO EASY TO DO.
DRAINS ARENT FOR OIL- IT F*CKS UP THE ALREADY SH*TTY SEWER TREATMENT SYSTEM & POLLUTES WATER SYSTEMS.
I GOTTA SURF IN THAT SH*T!!!!
Hope this helps.
(.
[/COLOR]


